10 ways to organize a notebook for work

When it comes to being organized at work, planning and keeping track of everything related to work is very essential and a work notebook is the best tool to do it. Wondering how a notebook can do all this? A well-planned and organized notebook can be the best system to do this. Now if you are wondering how to organize a notebook for work? I have got you covered.
I have over the years tried different types of planners and nothing would really meet my needs. Each planner would be good for one thing but none would have all that I need so, finally, I have for the past 2 years started using a notebook for work that I set up as per my need, it is like a bullet journal (BuJo) for work. In this post, I am sharing with you work notebook organization ideas that will
- Help you be organized at work
- Keep you productive
- Don’t let get all over the place
If you are struggling to be organized at work you must read 18 tips to be organized at work and 14 Tips to organize your work desk.
Let’s start with setting up a work notebook
This post contains affiliate links, which means I may receive a small commission, at no cost to you, if you make a purchase through a link.
Why you need to organize a notebook for work ?
Although there are many different apps and tools available to organize everything related to work, I feel the good old way of writing is the best way. Having a notebook dedicated to work brings everything together to plan and execute things easily.
Here are some reasons to use a notebook for work
1) Limits distraction:
When you write things down in a notebook there are no distractions that you face with a digital system like email notifications that tempts you to read the mail or work scape chats or another open tab in your browser. When you are writing with pen and paper you are just doing the task at hand and do not lose your thoughts.
2) You can use it anywhere:
Unlike digital organization and note-taking systems, you do not need an internet connection or battery and can practically use a notebook anywhere. I like to carry the notebook in the bag and at every meeting so that everything is gathered in one place.
3) Liberty to write my own way:
When writing in a notebook, I can use symbols and short words, draw lines, make a flow chart, and highlight the important things easily as the discussions are going on. The same can be done with digital tools but they take time and are not as convenient as writing.
4) It gives satisfaction:
I find it very rewarding to check off the tasks in my notebook and referring back to anything is much easy. Using different color pen make color-coding easy and is a very satisfying experience. Lets one have a little creativity.
5) The organization is easy:
With a physical notebook, you can make sections as you wish, and customize the way of writing as you want, doing it digitally takes time in setting templates and many times may not be as you want. An organized section for each activity clears your mind and helps you track things well.
Choosing the right book
Before we start organizing the book, you need to have the right notebook. I like to use an A5-size notebook as it has sufficient space to capture everything. I prefer the hardbound book as I know the book will be used a lot and for nearly a year. I do not like the blank notebook or the one with a dotted page as having lines make writing easy and the notebook is neat. You can choose any kind as per your need and liking. I have listed below a few pocket-friendly options.
My preferred A5 size, ruled, hardbound book
B6 size ruled, hardbound book– I have used it in the past and is a handy size.
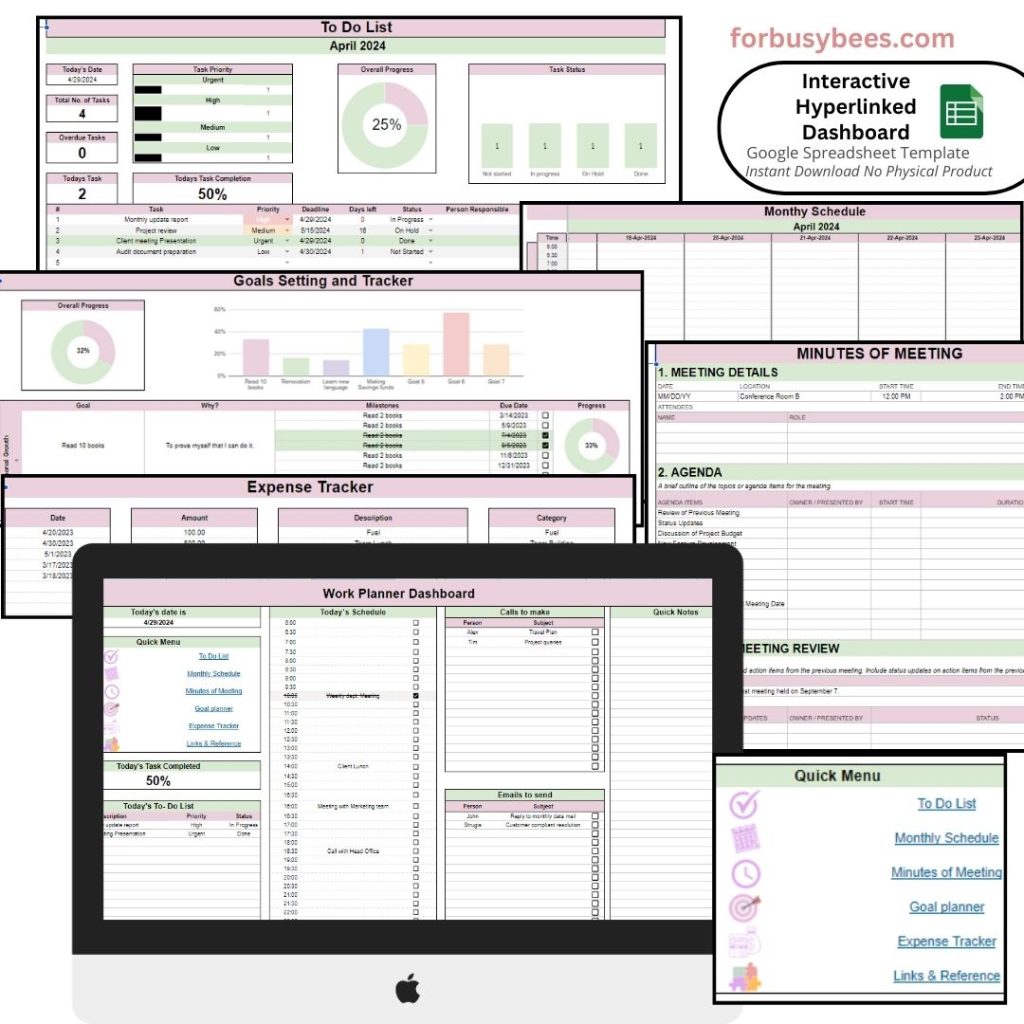
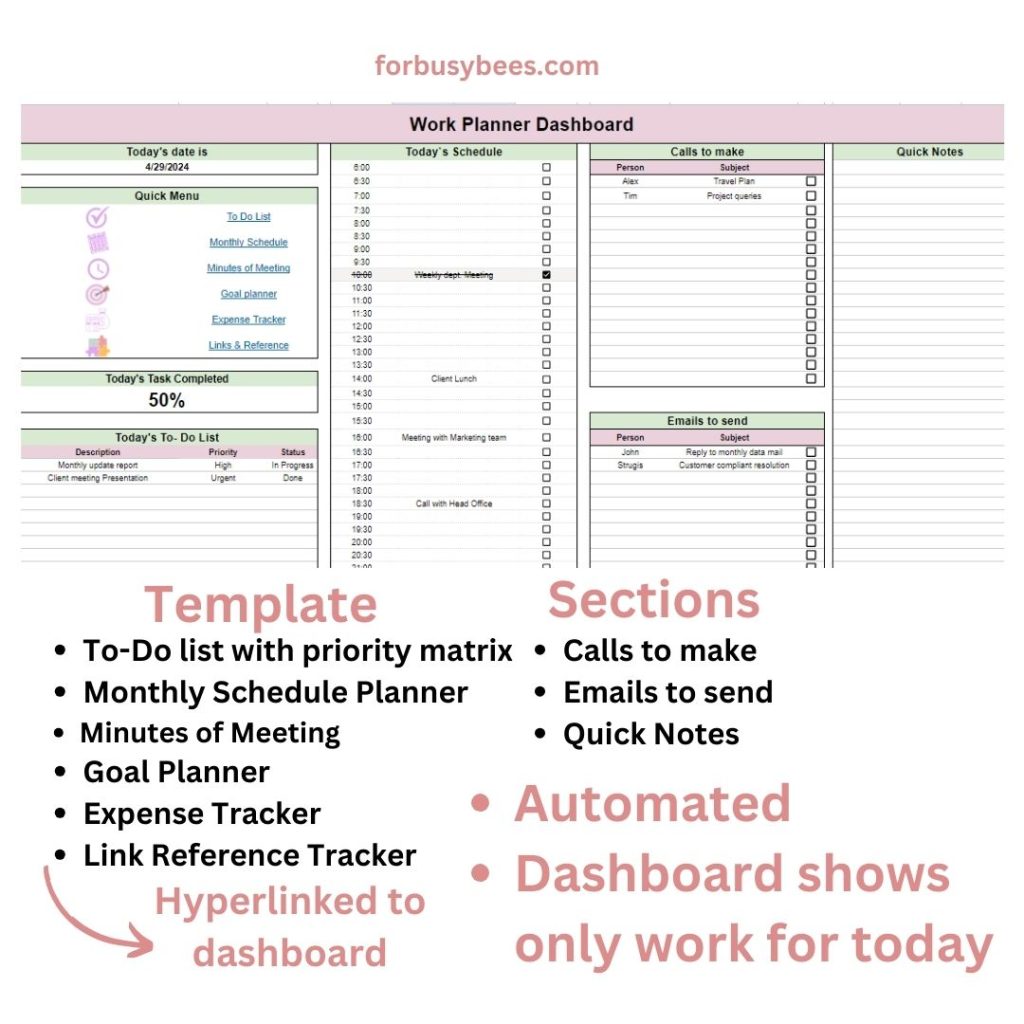
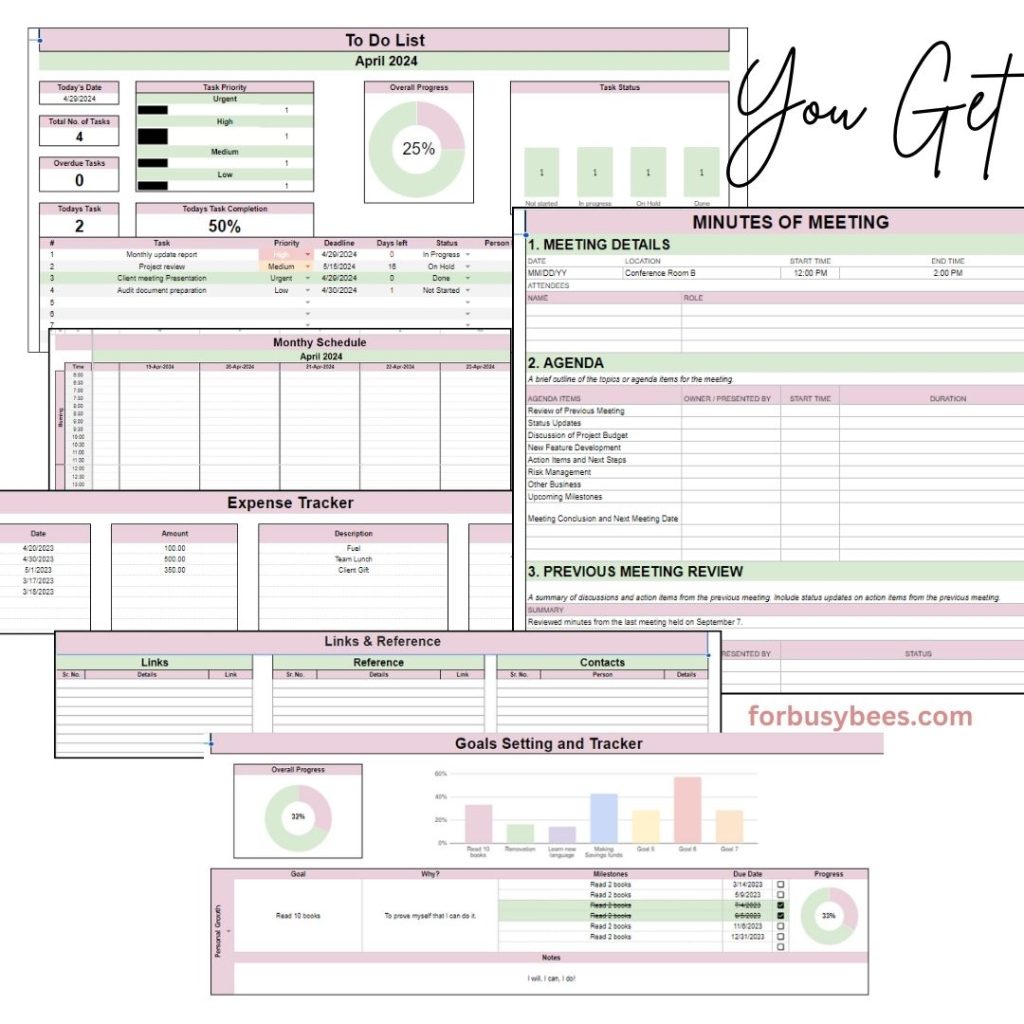
Before we dive deep into organizing notebook at work, if you are looking to completely organize your work you should check the below spreadsheet-based organization system. I absolutely love it.

How to organize a notebook for work
I am sharing here the way I like to organize my notebook at work. It is something that I have found to be working best for me. I use my notebook for work as a planner and note-taking system. Feel free to add sections as you wish or remove some that you do not need. Let’s start with organizing a notebook for work.

1: Make Key
The first thing that I write in my notebook is the key so that I am consistent with using it.
Here are the keys that I use:
☐ For Task
For Task completed
→ next to the task in the process
╃ DD/MM For Task with a deadline and mention date next to it.
⊠ For Task canceled
↷ Task postponed
_____ in red tasks that are critical
Once the keys are mentioned I like to move to set the notebook
2: Year glace section
I use two adjacent pages to add a 12-month calendar to create a year at glance. I split months on each page and circle around any important dates so that every month when I am doing my monthly planning I can easily refer back to take these important dates into consideration. For me, these important work dates are approval validities and the last date for submission of approval applications. Based on your work you can identify the important ones. I like to mark the deadlines such as validity in red and things that are necessary to be done by a particular date such as submissions of applications in green. Color coding immediately grabs attention to the most important things.
Most people who practice bullet journaling, make these monthly calendars by writing but I find it time-consuming and use printable calendars to print them out in small sizes and paste them into my notebook.
3: Monthly Planning section
Next, I set up my monthly planning pages in my notebook. For this, I leave 12 pages i.e six sheets, one for each month. I would write the name of the month on each sheet so that I can plan each month on one of these sheets. The monthly planning pages typically include things like three major goals for the month and important tasks that need to be completed in that month. I try to complete monthly planning by the first or second of each month. To know the details of monthly planning and all the things that I include in my monthly planning you can read my post on Monthly Goal Planning for a Balanced Life under 30 min and 15 things to do every month to make life easier.
4: Monthly review section
Next, similar to monthly planning I keep 12 pages for monthly review, this section follows immediately next to the monthly planning section and I would write the name of the month under review on the top of the page. There are two aspects of monthly reviews that I like to follow. One is reflecting back on the month under review and then see if the goals were met and if all the tasks that were planned for the month are completed, in case they are not completed I would include them in my next monthly planning.
The second part of my monthly review is related mostly to the core KPI of my work. KPIs are key performance indicators that are set at work for everyone to track their performance. Measuring the performance against KPIs and tracking them in my monthly review keeps me aware of progress toward achieving them. Also tracking down and reviewing the KPI allows me to know if I am lagging behind things and can take them into consideration for the next monthly planning.
I highly recommend doing a monthly review before you start to plan for the coming month to ensure you have a clear picture of the present situation in order to plan well for the coming month. To know more about monthly reviews in reflection you can read my post How to do Monthly reflection quickly and 100 end-of-month reflection questions for self-review.
5: Meeting notes section
Next, I would leave a few pages in my work notebook for taking notes on different meetings that I would attend, these will be kind of minutes of the meeting but I would necessarily capture only the details that are relevant to me or actions that are required from my side so I would not need an entire page for every meeting. I just write the date of the meeting, the agenda of the meeting, and bullet points for the key takeaway for me from the meeting, or any details I think I would need to take action on.
For any new task for me that is assigned during the meetings, I would directly add that to my to-do list section and the meeting section is just for any details from the meeting. In this way, I don’t need a complete page in the notebook for each meeting and I would just draw a line at the end of the page and use the remaining section of the page for some other meeting. If you are someone who attends a lot of meetings and thinks that these many pages may not be sufficient for you, you can make a separate notebook for meeting notes but I really believe that we can get everything in one book and find it more beneficial.
6: To-Do list section
Next, I would make a to-do list section with around 15-16 pages. I would further draw a line in the center of each page to make ample space to capture all tasks. I like to keep a running to-do list so that I clearly know the tasks that I need to perform and those pending long and use this section when I do my weekly planning. I don’t segregate my to-do list based on month or type of work. It is just a place where I frequently keep adding any of the tasks that I need to perform as and when they are identified so that I do not miss anything.
You may like to read my post 10 Ways To Make An Effective To-Do List. I also have a master to-do list for some of the repetitive tasks at work so that I do not have to write them every time and can refer back to them as per the schedule to ensure they are completed. The master list of tasks would be written just one time, to know more about the master list at work and how to make the right one that is suitable for you, read 12 Master Lists you must make to be organized at work.
7: Brain dump section
I have a section for brain dumping in my work notebook with just a few pages in case of situations when I am overwhelmed and unable to figure out where to start. Just dumping things out of my mind on paper de-stress me and lets me plan the next steps required to get things under control.
P.S. You should read my post Steps to reset your work-life after busy times if you find yourself overwhelmed at work.
8: Mind mapping section
The next section is for mind mapping. I use it seldom at work when I am learning something new or a concept that involves many elements that are interrelated. I would reserve around 10 pages for this in my notebook. Mind mapping is a visual thinking tool to simplify and structure information.
9: Daily writing section
The next section of the work notebook and the biggest section is the daily writing section. Except for the last page, all of the pages in my notebook for work are for daily use. I don’t use a complete page each day but mostly two pages would cover my entire work week of 5 days. At the weekly planning, I would just write the date for the day and three major tasks that need to be done on that day, leave a couple of lines for anything that may come up later, and go ahead with the next day. Since my notebook has all the major sections to capture every detail regarding my work. I just need 5 to 6 lines for each day.
I highly recommend doing weekly planning to be productive and plan work based on your To-Do list. You should read my post on Weekly planning secrets for work-life balance.
10: Frequent things
The last page of my notebook at work is for frequent things that I need to refer to such as the extension of frequent contacts, holidays, usernames, meeting codes, etc. I keep my work notebook with me and carry it back home daily, so I know others would not be able to reach it. But still, I suggest being careful with the information you put here, definitely not the passwords.
Tips to better organize a notebook for work
Here are a few tips that I find will help better organize your notebook at work and help you stay consistent with it and continue to be organized.
1. Make sections
To segregate different sections in your work notebook and help you easily reach a particular section use index tabs. They are easy to use, affordable, and help you organize sections. You can even write on them. Here is my favorite index tab recommendation.
2. Use colors
When journaling for work or planning things using different colors help you color code your notebook so that key things will pop up. It is also a good way to add some fun to use a notebook. Mark important task dates or pieces of information with different colors so you can easily identify them when needed.
3. Print monthly pages
If you like the monthly calendar layout and like to write important things on different dates of the monthly calendar you can print them in a smaller size and paste them into your work notebook to easily have the monthly layout feature in your notebook without spending a lot of time replicating it.
4. Use sticky notes to add up
In case you need to add something later on to a particular section in your notebook or update it with new information, use sticky notes to write the detail and paste it on that section of your notebook so that you have everything consolidated in one place in the relevant section. I would suggest putting additional glue and pasting it because after some time the posted notes peel off.
5. Add journal pocket
You can add a journal or planner pocket on the cover of your notebook to have additional space to keep your notebook accessories handy and organized. These are adhesive pockets that can be added to the corner of your notebook, you can check out the one that I like here. Make sure to check your notebook size compatibility. You can also use a pen holder pouch on the planner, to keep all your stationery together such as the one here.
6. Use washi tapes
Another good way of making your notebook at work more organized and functional is by using washi tapes. Nowadays there are professional-looking functional washi tips available that you can add to your work notebook. These have either the month or the dates or the task checkbox printed on them so that you need not write and can easily paste them to save time. It also gives you a happy feeling of using washi tape without making your work notebook look unprofessional and flowery. You can try the one below here.


Conclusion
So, this is how I suggest to organize a notebook for work. Although many have a notebook at work, most just don’t use it. Some write a few things here and there without utilizing the notebook. A well-planned and organized notebook at work can be your best tool for productivity and organization at work and office. Using the work notebook setup shared in this post I have found myself better organized and utilizing the notebook to complete potential.
Pin for later.